| The Underwater Hockey Tourist: Basic Individual Skills | |
|
This document has been taken from a skills clinic delivered in Champaign, Illinois by Roger Kemp
Puck Handling There are three basic "modes" of puck handling that underwater hockey players learn as we develop. I will describe all three modes and focus on the second and third modes, which most players should practice in order to advance their game. The first mode we learn is puck protection using the back of the blade. We discover that by keeping the puck on the back of the blade and close to the body we can shield it from the opposition and execute several different under-the-body back moves. In order to succeed at this, it is necessary to keep your head and shoulders close to the pool bottom to prevent opposing players from reaching in. Because of this, your vision of teammates is restricted, making this an individual mode of play. The second mode of play is to be able to control the puck on the front of the blade. This is described in more detail below. The overall effect of playing in this style is that your body is higher off the pool bottom allowing you to always have a view of both the opposition and your teammates. This allows you to play as a better team player. The third mode of play is to be able to control the puck on the front and back of the stick interchangeably by rolling. This mode of play marks the transition from what I call "push hockey" to "pull hockey". In the beginning, we all find success by pushing the puck through the opposition and knocking it off their sticks. We can only get so far by doing this. Once we can pull the puck away from the opposition and advance it all in one motion (through rolling the puck) we are playing pull-hockey. Playing in this fashion requires less brute strength and uses more finesse. In essence, the most efficient style of play is one where you make subtle puck moves rather relying on your strength to push your way through the opposition. In order to have success with the puck movement skills described below it is important to relax your arm and shoulder as you do them. Don't keep your arm stiff. When an opposing player tries to punch the puck off your stick as you execute these skills, your whole arm will give in with the motion. The result of this is that you end up with your stick still on the puck, simply in a new position.
Front of blade:
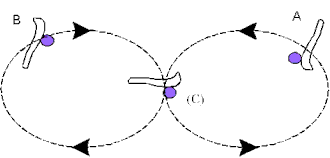 In the Figure-8 drill, you move the puck in front of your body, from side to side. When practicing the skill, exaggerate the puck movement by moving the puck from the right of your right shoulder all the past your left shoulder. Don't rotate your torso in order to get the puck to the extreme left. Keep your shoulders square with the pool bottom. There are a few elements of the drill that are unfamiliar to many players. When you reach point (A), you will need to release your grip on your stick somewhat. You will end up holding your stick by only your thumb and forefinger at this point. It helps if you have your index finger attached to your stick with an elastic band. I use a "pony tailer" hair elastic and loop it between the handle and index finger. This will allow you pivot your stick around your finger without losing it. At point (B) you need to "break" your wrist so that your knuckles start to point towards you. The stick will rest in your fingers and no longer rest in your palm. The hardest parts of the drill are the transitions from (A-C) and particularly (B-C). When moving the puck from (B-C), the front of your blade and knuckles end up pointing towards your body. Some of the important elements to concentrate on in this drill are:
Once you can do the drill comfortably, speed up the motion and do not look at the puck. Add motion to the drill by swimming diagonally left and right while doing the drill.
Puck Rolling:
 Important points to remember when doing this skill:
Practice this motion so that you can execute it quickly without looking at the puck. You can add this skill to your game by rolling the puck from the back of the blade to front while curling, checking opponents by pulling the puck away, and executing quick left and right changes of direction.
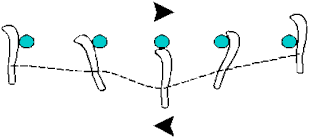
A more difficult drill is to execute a "V" with the puck in front of your body while spinning it continuously. The motion of the stick and puck are shown in the diagram below. 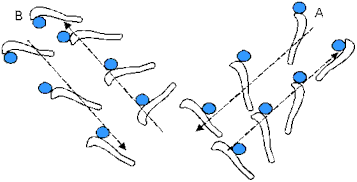 Important things to remember when doing this drill:
Practice this drill slowly at first, concentrating on your form. Once you can do it without looking at the puck, execute the drill while swimming. Pick a pair of lines on the pool bottom that are about two metres apart. Starting between the lines, swim diagonal cuts back and forth, rolling the puck as you go. Shooting/Flicking
Shooting is the skill that everyone wants to learn but is also the hardest skill to teach. Almost all of the distance on the puck comes from the wrist flick. I believe that the rest of the motion of the shot (shoulders, arms, etc.) contributes to changing the "pitch" of the puck (like an airplane taking off). There are a few key elements to good shooting technique.
Distance will come if you can become effective at getting the puck off the pool bottom. The best way to practice shooting for height is to use a barrier. Turn a goal trough upside down so that it forms a barrier (start with a lower barrier if necessary). For most people there is a "sweet spot", a distance where it is easy to get the puck over the barrier. Usually this distance is about a metre or so. Start by moving the puck closer to the barrier and shooting over it. Eventually you will be just a few centimetres from the barrier with no room for any wind up. Shooting over the barrier from so close emphasizes the wrist flick.
When you can shoot the puck over the barrier from very short distances, choose distances farther than the sweet spot. This will concentrate on the arm and shoulder mechanics and add height to your shot.
Another difficulty to add to your shooting practice is to start your shot with your arm extended to your side and shoot sideways. It's a flick we often want to use in a game but don't often succeed.
Curling
Curling is probably the first skill we learned when we started playing the game. What could possibly be said about curling? Lots. One of the things that we always need to remind people in game situations is "Kick through your curl!" In fact, I suggest to players that they chant this mantra as they carry the puck along the pool bottom.
It is worthwhile to practice different curling drills in order to improve your form and efficiency, particularly on reverse curls. A standard curling relay drill involving three players is done is follows.
Two of the players start at the wall and the third starts about 5 lanes down the pool. The players carry the puck in a relay fashion executing four 360 deg curls on one breath as they swim to the next player.
There are two variants to this drill: back of the blade and front of the blade curls. Most players carry the puck on the back of the blade while curling. It allows a quicker turn and a tighter curl. However, many players keep the puck on the back of the blade the whole way through the curl. This forces them to readdress the puck once they finish the curl, and they are not ready to make an immediate pass. Also, if the puck is still on the back of your stick at the end of the curl, it is necessary to keep your head and chest down to protect it.
To avoid this, practice spinning the puck from the back of the blade to the front, half way through the curl. It will leave you ready to pass the puck and allow you to keep your head up at the end of the curl. With the puck on the front of your blade you can protect it (and keep your head up) using the front of the blade skills described earlier. Do this on both your forward and reverse curls.
Curling with the puck on the front of your blade makes for a slightly slower curl but leaves with more options to move the puck or pass to a teammate while curling. This is especially so with reverse curls. Note where your head is when you reverse curl with the puck on the front of your blade as opposed to the back. You should notice that your head and chest are both higher off the pool bottom giving you better vision of potential passing options behind you. You will also find that the puck is in front of your shoulder (rather than to the side), allowing you to make a much better pass. Reverse curls done in this manner tend to be wider and you clear out a lot of space as you kick through the curl. Since the defender must respect this, this curl is not just a defensive move.
Some key points to remember when practising the various curls:
Note: This document has been written from the perspective of a right-hander.
| |